Содержание
Shaker Touch 2
Protein Vending Machine
This manual is intended for owners, operators, and technicians installing, configuring, operating, and initially troubleshooting the Shaker Touch 2 vending machine. It contains key instructions for preparing the machine for operation, configuring settings during operation, connecting payment services and remote monitoring, describing functional errors and troubleshooting them.

Frequently Asked Questions and Answers
Introduction
Shaker Touch 2 is an automated vending machine for preparing cold sports nutrition drinks from powdered mixes and liquid concentrates. The machine is designed for indoor use with ambient temperatures ranging from 10 to 40°C and relative humidity no higher than 65%. The machine is equipped with eight containers for dry powder mixes and six peristaltic pumps for liquid concentrates. The machine can be connected with any MDB-compatible payment terminal, as well as contactless payment methods. Various remote access programs and telemetry are used for monitoring the machine's status, sales, and remote control. The vending machine is equipped with an automatic cup dispenser with a receiving tube capacity of approximately 100 300ml cups, as well as a «Your own shaker» option, allowing customers to use their own shaker. Stickers with QR codes are located on the inside of the vending machine door, leading to the user manual and technical support.
Safety requirements
General rules
Please read the instructions carefully before starting operation to ensure the safe and correct operation of the equipment.
- Persons who have studied this manual and have been instructed on electrical safety are allowed to service the machine.
- Use gloves when working with the machine.
- It is forbidden to allow unauthorized persons to access the machine during technical work.
- If there are foreign odors (burning), smoke, or uncharacteristic noise, it is necessary to immediately de-energize the machine by following the routine shutdown procedure (see the section «Turning on, off, and restarting the machine»), and contact technical support.
- It is forbidden to turn off the machine using only the main power switch. This can lead to damage to the machine's file system and loss of functionality.
- Maintenance (cleaning, replenishment) should be carried out at least 2 times a week, in fact, it will depend on the intensity of operation. Refer to the Shaker Touch 2 maintenance article for a detailed description.
- In winter, when transporting the machine in subzero temperatures, it is mandatory to warm up the equipment in a warm room. It is forbidden to turn on the machine with traces of moisture or condensation on the wiring or circuit boards.
Electrical safety
- The machine must be connected to the power supply network through an outlet equipped with a protective grounding.
- Do not use damaged network cables, extension cords, or adapters.
- Before performing troubleshooting work, it is necessary to disconnect the machine from the power supply by completing a complete shutdown cycle (first the computer, then the main power switch).
- The fuse box is energized. Replace the fuses only when the machine is completely de-energized, using fuses of strictly specified ratings (see the Fuse box section). Installing fuses of a different rating may cause damage to the equipment.
Safety during operation (working with products and consumables)
- Before filling the new powders into the container, make sure that there are no foreign objects in the package (measuring spoons, bags). Their entry into the feeding system leads to a breakdown of the machine.
- Do not allow drinks to be sold without pre-settings and without test preparations.
- Use only cups that meet the manufacturer's requirements. It is forbidden to use crumpled, deformed or plastic cups. The cups should be loaded carefully, without tamping.
- It is forbidden to operate the machine without first adjusting the cup dispenser unit to the diameter of the cups used. This may cause the mechanism to jam and break.
- The «Own shaker» function is activated in the settings of the service menu. The option only works when the cup sensor is turned on. The maximum height of the installed shaker is 18 cm. Exceeding the limit will result in cancellation of the purchase by the vending machine.
Power supply
The machine is designed to operate from an electrical network with a voltage of 230 +5/- 10B (For the CIS and EU countries).
The power consumption at its peak (during the preparation of the drink, with the standard cooler turned on, the average value) is up to 300 W/h.
The total power consumption per month (with the standard cooler turned on, the average value) is 46 kW.
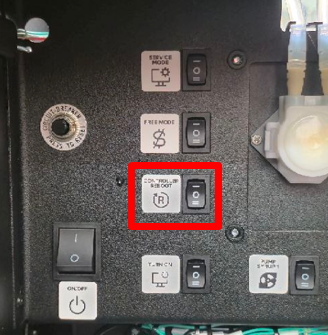
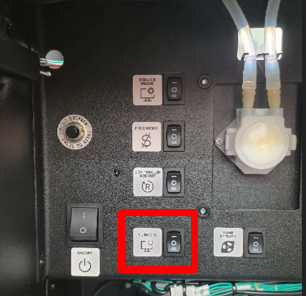
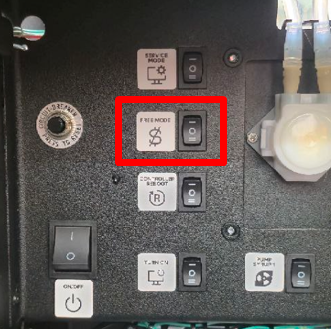
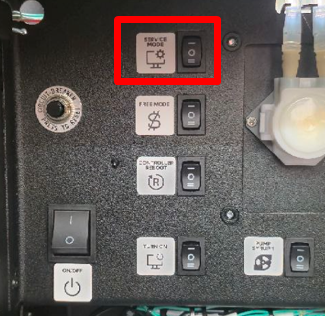
Control panel
The control panel is located inside the machine, under the mixer shelf.

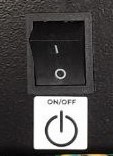
- Main power switcher;
- PC on/off button;
- SERVICE MODE - opens the service menu of the machine;
- FREE MODE - turn on a free mode for 15 minutes;
- Кнопка CONTROLLER REBOOT - restarts the application and the control board of the machine;
- Pumping buttons for peristaltic pumps 1-6.
Pre-launch preparation
Follow these steps before turning on the machine:
- Remove all shipping materials and packaging;
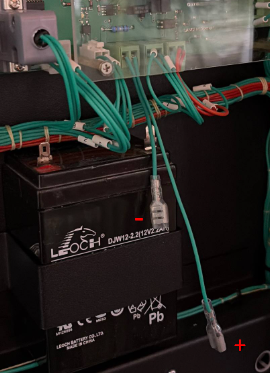
- Remove the back panel of the machine and connect wires to the UPS machine battery;
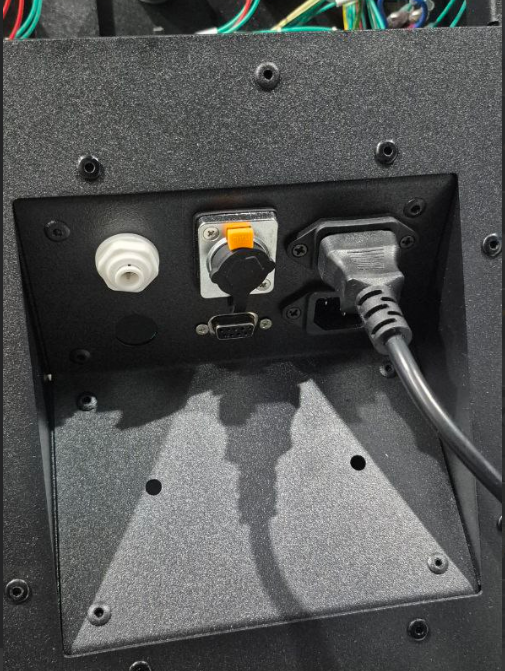
- Connect the 220V cable to outlet of the machine;
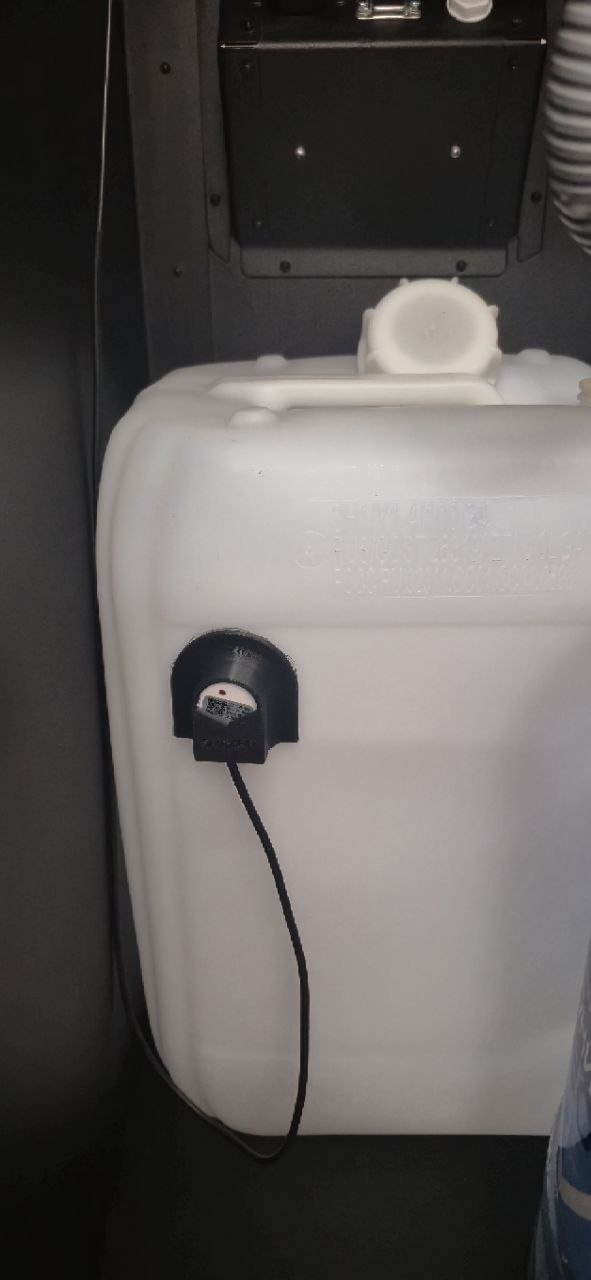
- Remove the protective film on the mounting frame of the waste sensor and glue it on to the waste container;
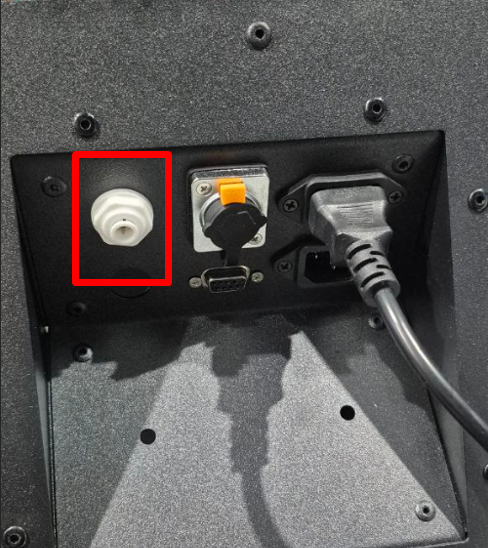
- When choosing a water supply from an internal source, prepare a container with water. When choosing a water supply from an external source, install 3-5-cell filters and connect them to the inlet connector on the back side of the machine.
- Prepare the powders, cups, and syrups. To calibration procedure, you will need a kitchen scale and a measuring cup.
- Prepare payment devices and services. Registration and paperwork take time, which can slow down the sales launch process.
Turning on, off, and restarting the machine
Turning on
On the control panel, switch main power switcher to the «I» position. When the «No signal» message appears on the screen, press PC on/off button.
Restarting the controller
Restarting the controller is used to reset the errors. Click the button CONTROLLER REBOOT at control panel of machine.
To restart the machine's computer, press PC on/off button, then press Power Off on the screen. Wait for the computer to turn off (the screen will go out, the No signal message will appear), press again PC on/off button.
Shutdown
⚠️Turning off the machine's power without first turning off the computer can lead to data corruption and unstable operation of the machine!
Procedure of actions:
- Press PC on/off button. Wait for the computer to turn off (the screen will go off, the message «No signal» will appear);
- Push main power switcher, by switching to the «O» position.
Water supply
The machine has two water supply configurations:
 Connecting to the Central Water Supply System (Touch 2) (external source).
 Connecting to the water tank (Touch 2) (internal source).
Machine operation modes
Paid mode
It works by default. Turns on after reboot with the button CONTROLLER REBOOT.
Free mode
Activated by pressing a button FREE MODE. A corresponding message will appear on the screen in the upper-left corner. It runs for 15 minutes, then switches to paid mode. It turns off when the button CONTROLLER REBOOT pushed or by pressing a button SERVICE MODE.
Service mode
Activated by pressing a button SERVICE MODE. Open access to the machine settings.
Connecting payment devices
Before installing payment devices, make sure that they work in the MDB protocol. The MDB-connector is located on the inside of the door.
When using cashless payment terminals, it is necessary to check the configuration of the settings with the equipment supplier. The following settings are required:
- MDB level = 3;
- Always Idle option (not pseudo-, not an emulation) = on;
- Ignoring the prices of vending machine = off;
- Waiting time for payment = 60 seconds;
- Waiting time for the product to be delivered before automatic return = 180 seconds;
- Settings of the starting, maximum credit, multiplier are optional, according to the currency used.
For companies using RFID technology as payment, there is a solution for integrating these modules. Contact the sales department for details.
Powders loading
To remove the container:
- Turn the spout of the container up;
- Lift the front part so that it comes out of the hole in the housing;
- Pull the container towards you.
⚠️ATTENTION! THE INGRESS OF FOREIGN OBJECTS INTO THE POWDER SUPPLY SYSTEM MAY CAUSE THE MACHINE TO BREAK DOWN! Please note that some manufacturers put measuring spoons in powder bags. Before filling, make sure that the spoon does not fall into the container.
After loading the powder into the container, install it in place, fixing the back of the container to screw motor, and the front part – pin to hole. Turn the spout of the container down so that the bottom of it touches the funnel of the mixer.
⚠️Attention! Always check the tightening of the screw nuts before installing the container.

Syrups connection
To store bags with liquid drinks, use the shelf at the top of the vending machine, above the powder containers.
Steps to setting up:
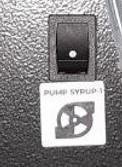
- Put the connector on the valve and turn the collar on the connector clockwise until it stops, while the red flags on the valve should move to the lower position, the concentrate should enter the hose;
- Fill the system using toggle switches PUMP SYRUP on the control panel before the concentrate exits the filling hoses.
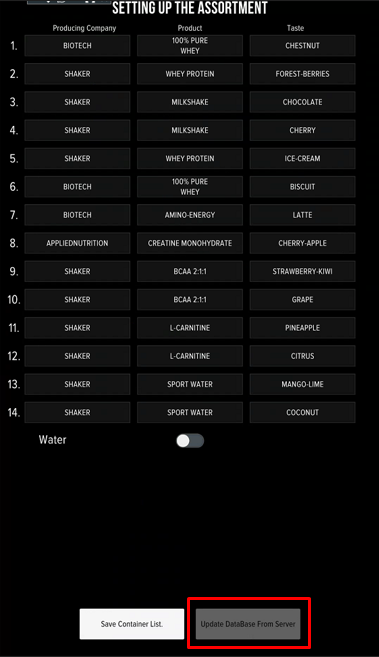
- Select the brand, the name of the line and the taste for drinks No. 9-14 in the service menu (Change drinks button).
- Calibrate the added drinks, adjust dosages, prices, and volume of drinks before launching on sale.
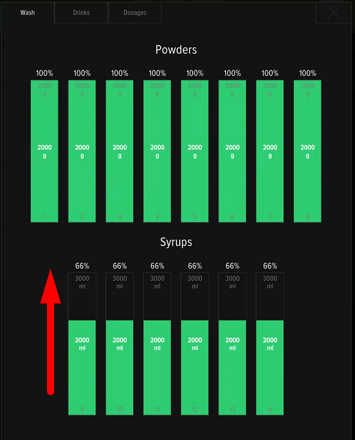
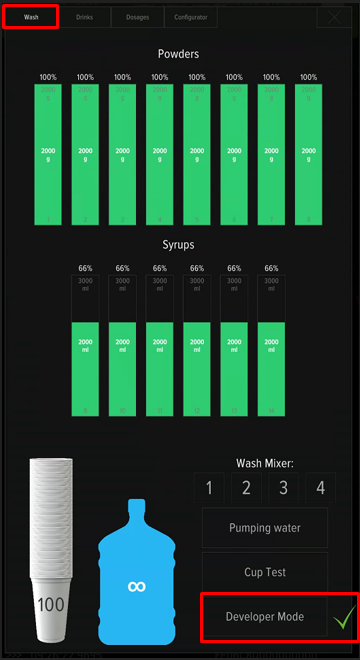
- Set the remains values in the service menu according to the filling of the syrup container - just swipe column up.
Cups loading
⚠️important! Before preparing drinks, you should set up the cup dispenser for the diameter of your cups. The operation of the machine without setting up is prohibited!
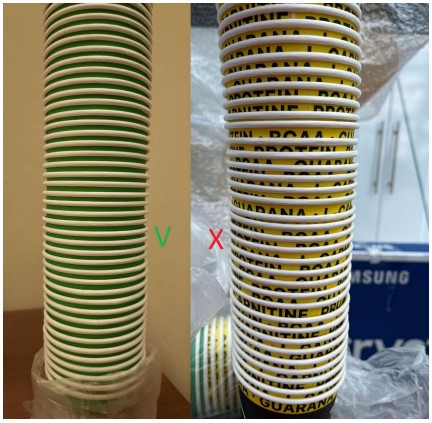
Requirements for cups: diameter no more than 90 mm, height no more than 110 mm, volume up to 400 ml, material - paper (cardboard).
It is forbidden to use red and black cups, crumpled and deformed cups, as well as plastic cups. The distance between the cups in the stack should be the same, from 4.3 mm to 8 mm.
You should carefully load the cups into the tube, dividing it into 2-3 parts and holding it with your hand from below, through the cleaver hole. It is forbidden to tamper the cups when loading them.
The capacity of the tube depends on the size of the cups used and the distance between them in the pack. When using 300 ml cups with a distance of 4-8 mm between them, the tube holds about 100 cups.
If you use unsuitable cups or have problems handing out cups, the Error 5 No Cup message appears on the screen.
⚠️important! The cups is separated due to the weight of the stack, so the dispensing unit may stop dispensing cups when the quantity is low. Just fill the tube with a new stack.
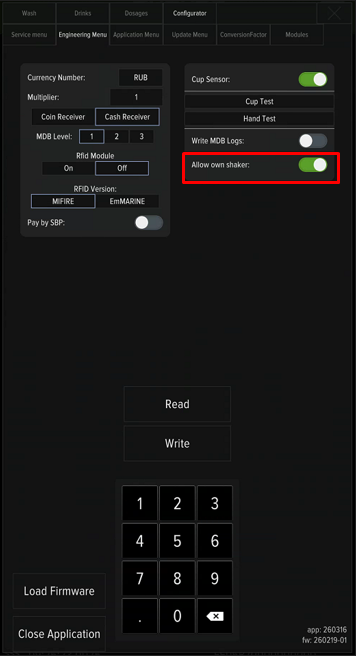
Using your own shaker
This option is enabled by default and allows customers to set their own shaker for making a drink. The maximum height of the shaker is 18 cm. If exceeded, the height sensor will trigger and a message will appear on the screen «The height limit of the shaker has been exceeded».⚠️ Attention! This option cannot be used with the cup sensor turned off!
Setting up a range of flavors, setting prices and dosages for drinks
Setting up an assortment of tastes
- Push SERVICE MODE;
- Click "Developer mode" button;
- Go to «Configurator» tab;
- At «Configurator» tab screen push "Change drinks" button;
- The containers inside the machine are counted from left to right, and numbered from 1st to 8th position on the assortment settings screen. The numbering 9-11(14) is used for concentrates.
- If the desired drink is not found, push "Update database from server" (requires a telemetry and internet connection);
- Click «Save drinks list» to save the settings and return the machine to the drinks selection menu.
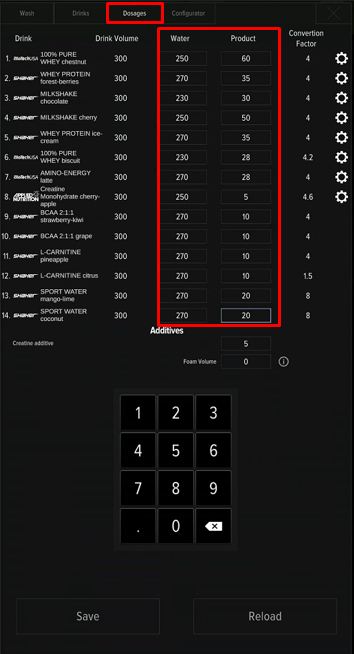
Products calibration
Calibration is performed in two cases - before the machine is put into operation and when changing powders/ syrups during operation. The procedure will require a measuring cup and kitchen scales.
The initial calibration includes:
- Verification of water dosage;
- Verification of powders dosages;
- Verification of syrups dosages (if used).
A re-verification is performed in case of a change in the products used (another brand, another product lines).
Calibration consists of product delivery, weighing and correction input on the machine screen. Open SERICE MODE, go to Configurator - Conversion factor}, choose a product (water, powders or concentrates) and follow instruction:
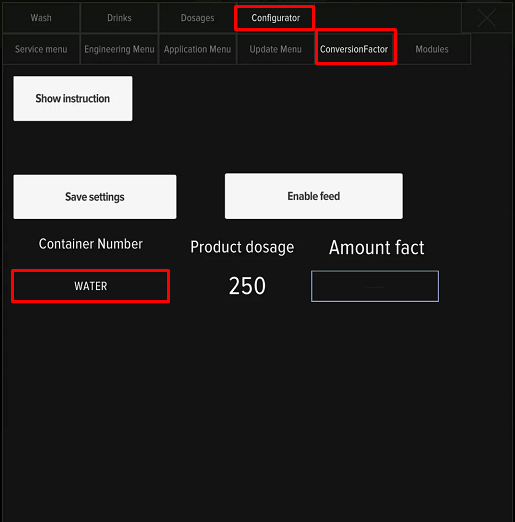
- Install the measuring cup in the beverage window, or cup under powder dispenser, or a cup under filling hose
- Push «Enable feed» and wait for product delivery;
- Measure the quantity of product;
- Enter the received value, without the weight of the cup, in the field «Amount fact»
- Push «Save settings»
- Repeate a procedure for everything products untill measured dosage matches the Product dosage value.
Calibration is considered successful if the measured dosage differs from the Product dosage: for powders - +-1.5g, concentrates - +-1ml, for water - +-10ml.
Calibration video process:
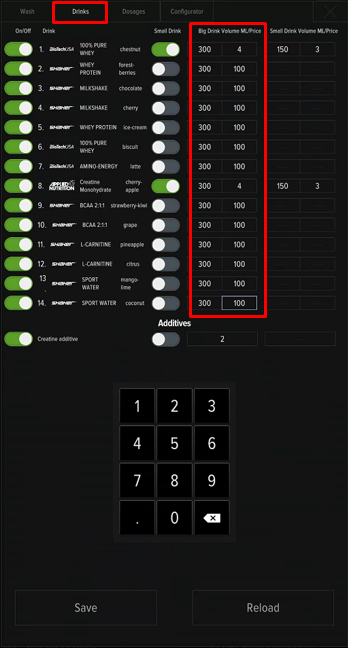
Setting prices and dosages
- Push SERVICE MODE;
- Go to "Drinks" tab for prices and drinks volume setting;
- Go to "Dosages" tab for dosages setting. Follow the manufacturer's recommendations (usually indicated on the packaging). You can change the dosages at your discretion to achieve the best taste of the drinks - if there are no ingredients in the composition that strictly limit the daily dosage (for example, caffeine). You may use 220ml of water and 30g of powder as the base for setting up protein drinks. Calibrate the powders and water, prepare and taste the drink. To achieve a better taste, change the dosage - add a little product (in 5g increments) or reduce the dosage of water (in 10ml increments);
- After completing settings, click the «Save» button and close the menu.
Internet connection
An internet connection is required for the operation of telemetry and the possibility of remote connection to the machine. Connections are being used:
- Connecting the LAN cable from the router to connector near with power cable (does not require any settings).
- Connecting to WiFi networks (before use, connect antennas).
- Mobile Internet connection (USB-modem)
Connecting to WiFi:
Connection and operation of Shaker telemetry
To set up and operate the telemetry, registration of the user's account and a permanent Internet connection are required. For more information, contact with Shaker technical support.
Setting up a remote connection
The following programs are used for remote connection to the machine AnyDesk and MyAssistant. An internet connection is required for remote connection. You can find the installed programs on the desktop of the machine.
Errors and malfunctions
If the machine malfunctions, a message with the error number appears on the screen. To reset the errors, press CONTROLLER REBOOT on the control panel of the machine, if errors occur repeatedly or regularly, refer to the corresponding manual:
Error 9 Manipulator Error (Touch 2)
Error 11 Dispensing Window Shutter Error (Touch 2)
Error 21 Timeout for installing your shaker in the pickup window (the machine will close the pickup window and issue a refund if the window is empty for longer than 15 seconds)
Error 22 Your shaker is too large in the dispensing window (height sensor is triggered, the machine will not start cooking while the shaker is too large in the dispensing window)
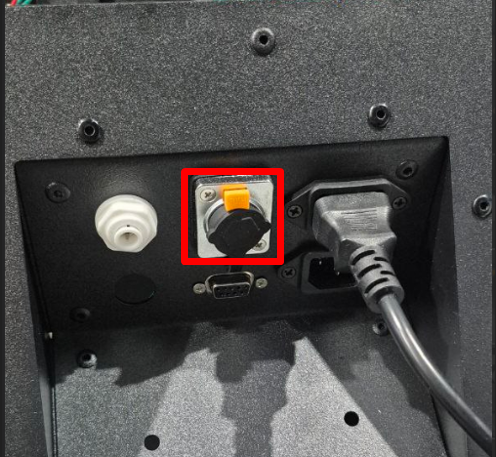
Fuse box
The fuse box is located inside the machine, behind the powder container №8. Use theglass fuses 5×20 nominal values 2, 3.15 и 4А. ⚠️If the diodes light up in standby mode or during cooking, this is a sign of a burnt fuse. It is necessary to replace the fuse next to which the diode lights up. Visually, the faulty fuse has traces of soot, the fuse insert inside (thread) is damaged.

- The main controller's power fuse 24 V (input from the UPS) 4А;
- Power supply of mixer motors 3.15А;
- Electric valve power fuse 2А;
- The backlight RGB 2А;
- Power supply of peristaltic pumps (syrups) 2А;
- Electric door lock 2А;
- Fuse for the glass dispenser module 2А;
- Fuse of the step-down converter 24V to 12V for PC and display 3.15А;
- Power supply of display 24V 3.15А;
- Fuse for the electric valve of the water pipe 2А;
- Cooler/Boiler reserve 2А;
- Powering PWM mixers 3.15А;
- Fuse for PWM dispensers 2А.